Docking Station Not Detecting Monitor? HDMI, DisplayPort & USB-C Failure Modes Explained
The Black Screen Paradox
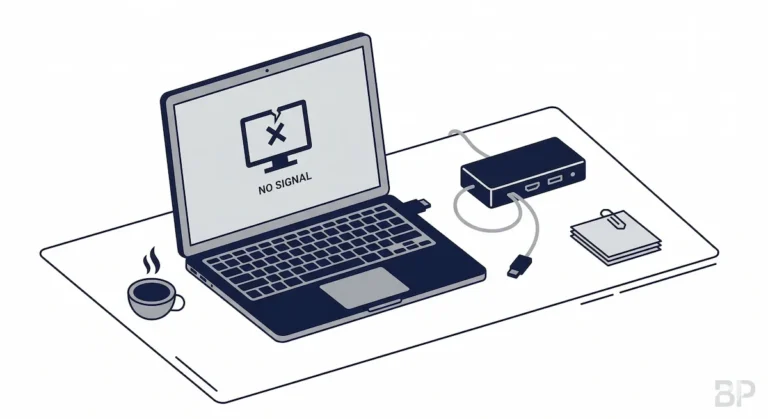
Your docking station is powered. USB works. Ethernet works. The monitor shows “No Signal.”
A docking station not detecting monitor output is one of the most misdiagnosed failures in modern workstation setups — because everything else keeps working. That combination — partial function, failed video — has one explanation: DisplayPort negotiation collapsed before the OS could establish a display path. Power and data run on separate subsystems. Video fails first because it requires a three-way handshake between your laptop GPU, the dock’s conversion chip, and the monitor’s EDID data. When any layer in that chain breaks, the screen goes dark.
This guide maps every layer where that negotiation breaks down — source, transport, conversion, handshake — and gives you the exact fix for each failure class.
Observed failure distribution (2025–2026):
“No Signal” with working USB/Ethernet → wrong USB-C port (no DisplayPort Alt Mode)
Black screen but OS detects monitor → EDID/handshake failure, often after sleep
Only one monitor working → MST limitation or bandwidth allocation failure
Works direct, fails via dock → dock conversion chip or firmware instability
These are not edge cases. This is the dominant failure distribution across modern docks. Failure patterns also differ significantly by brand — see which docks fail most.

Thunderbolt 5 docks introduce a new failure class: Boost Mode bandwidth reallocation. When a TB5 dock switches between 80Gbps baseline and 120Gbps Boost Mode, the display tunnel briefly drops during renegotiation — causing a black screen that lasts 1-3 seconds. This is not a hardware defect. It is a protocol transition. The fix is disabling Boost Mode in the dock’s firmware settings if your monitors don’t require it. Affected docks include the CalDigit TS5 Plus, Razer TB5 Chroma, and Kensington SD7100T5.
🟢 Early Bird — Haven’t Bought a Dock Yet? Read This First
Monitor detection failures are almost always setup failures — wrong port, wrong cable, wrong dock for your laptop. Buying a new dock without understanding the failure layer will not fix the problem.
Before you buy, ask yourself:
- Does my laptop have a Thunderbolt or USB-C port with DisplayPort Alt Mode?
- Do I need dual monitors? (Not all docks support MST — and macOS doesn’t at all on base chips)
- Am I running 4K@60Hz? (Most budget docks can’t deliver it reliably on both outputs simultaneously)
If you’re unsure what your laptop supports, the dock comparison table below maps bandwidth, MST support, and display output per dock — so you match the right dock to your exact setup before you spend anything.
Not sure which dock fits your setup? Compare all 81 docking stations side by side — filter by connection type, displays, power delivery, and OS in our Docking Station Comparison Tool.
The Display Signal Reality: What Your Docking Station Actually Does

Before going deeper, most failures happen here:
- You’re plugged into a USB-C port that does NOT support video
- You’re using HDMI where DisplayPort is required for stability
- You’re expecting dual monitors on a system that doesn’t support MST (macOS base models)
- You’re mixing adapters (USB-C → HDMI → Dock) creating multi-layer signal conversion
If any of these are true, the dock is not broken. The setup is.
A docking station is not a magic video generator. It is a protocol translator and traffic manager. Its core function is to take the DisplayPort video signal embedded within your laptop’s Thunderbolt or USB-C connection and route it to one or more physical outputs (HDMI, DisplayPort, USB-C). Every failure occurs at one of four distinct layers in this chain:
- The Source (GPU): Is your laptop’s graphics driver correctly outputting a DisplayPort signal over its USB-C/Thunderbolt port?
- The Transport (Cable/Protocol): Is the signal being carried intact by a compliant cable and accepted by the dock’s input controller?
- The Conversion & Routing (Dock Internals): Is the dock’s display controller chip splitting or converting the signal correctly for its output ports?
- The Handshake (Monitor EDID): Is the monitor communicating its capabilities (resolution, refresh rate) back to the dock, and is the dock relaying that to the OS?
When a docking station is not detecting a monitor, it means the display signal handshake has failed before the operating system can establish a usable video path. Power, USB devices, and Ethernet can still function normally because they rely on simpler protocols. Video output fails first because it depends on precise DisplayPort negotiation, cable compliance, and monitor capability exchange.
Understanding which layer is at fault is the difference between swapping cables randomly and executing a surgical fix. For example, a docking station not detecting a monitor is typically a Layer 1 or 2 failure (source or transport), while a black screen on a detected monitor is a Layer 3 or 4 failure (conversion or handshake).
Failure Class #1: Docking Station Not Detecting Monitor (No Signal, No Detection)
2026 Update
Windows 11 24H2 Thunderbolt Display Regression
Windows 11 24H2 (released October 2024) introduced a new kernel-level display driver model that changed how Thunderbolt controllers enumerate displays on cold boot. Several users across Thunderbolt 4 docks (CalDigit TS4, Kensington SD5780T) reported monitors failing to detect on first plug-in after the update, requiring a second unplug/replug cycle. Microsoft acknowledged display enumeration timing issues in KB5043145. Fix: ensure your dock firmware is current and your Intel Thunderbolt driver is version 1.41.1920.0 or later from Intel’s site — not the OEM version.
The Symptom: The monitor shows “No Signal.” The operating system (Windows Display Settings or macOS System Preferences > Displays) shows no second display. It’s as if nothing is plugged in.
The Diagnosis: This is a failure at the source or transport layer. The digital introduction between your laptop and the docking station never happens. This is the most common reason a docking station not detecting a monitor appears completely dead despite being powered.
Root Causes & Fixes:
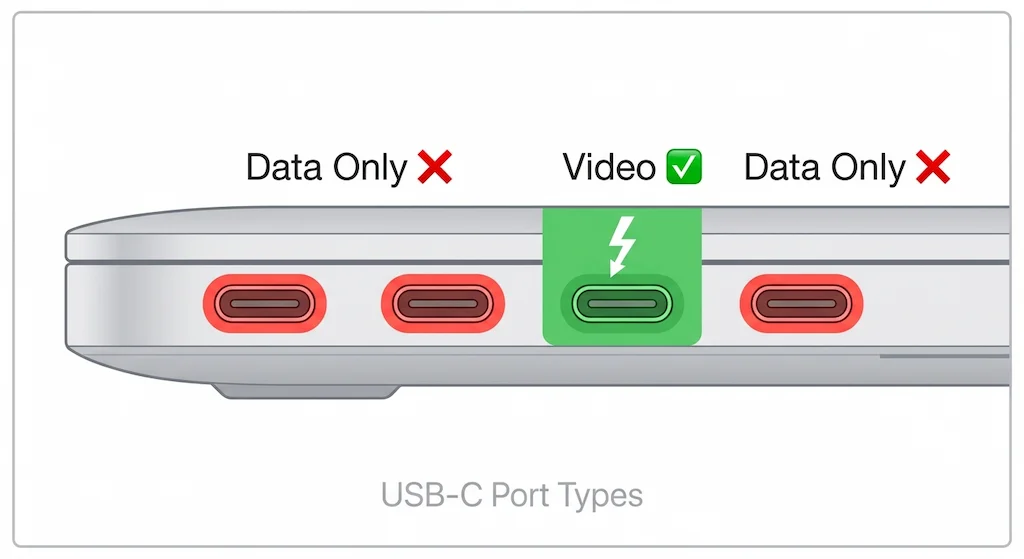
- Wrong Port Type (The USB-C Illusion): Not all USB-C ports on a laptop support video (DisplayPort Alt Mode). Many are data-only, especially on cheaper models or secondary ports. Fix: Consult your laptop manual to identify the correct video-capable port, often marked with a DisplayPort or Thunderbolt (⚡) icon.
(USB Implementers Forum specifies DisplayPort Alt Mode as an optional feature of USB-C — it is not required by the USB-C specification. Source: USB-IF USB Type-C Spec Rev 2.1, Section 4.5) - BIOS/UEFI Setting Disabled (Windows-Common): On many Windows laptops, DisplayPort over USB-C is a BIOS option that defaults to “Disabled.” Fix: Reboot, enter BIOS/UEFI (F2, Del, F10), and find settings like “USB Configuration” or “Thunderbolt Configuration.” Enable “DisplayPort over USB-C” or “Thunderbolt Display.”
- Thunderbolt Security Blocking (Enterprise Laptops): Security levels like “User Authorization” can silently block new displays. Fix: Temporarily set Thunderbolt security to “No Security” in BIOS to test. This is a known hurdle documented in our guide on Thunderbolt Dock Not Detected issues.
- Passive Adapter Catastrophe: Using a passive HDMI or DisplayPort adapter with a docking station that already performs internal signal conversion can garble the signal. Fix: Connect the monitor directly to the dock’s native ports. If you must adapt, use a high-quality, active converter.
The same BIOS Thunderbolt security setting that blocks dock detection also blocks Thunderbolt Bridge — set security to No Security once and it resolves both.
Dell dock owners hitting detection failures should check their driver stack before anything else. Dell docking stations need four specific drivers — and the Intel UHD Graphics driver is the one most people miss. Without it, USB works and displays stay dead. Our Dell Docking Station Drivers guide covers the exact install sequence, model-specific packages, and the five driver failure patterns that show up after a clean install.
Failure Class #2: Docking Station Detects Monitor but Screen Is Black

2026 Update
macOS Sequoia 15.x HDMI Handshake Failures
macOS Sequoia (15.0–15.3) introduced stricter HDCP enforcement on external displays. Docks with older HDMI conversion chips that don’t fully support HDCP 2.3 now cause black screens on wake — the OS detects the monitor but refuses to output signal. This affects primarily third-party docks with MediaTek-based HDMI controllers. Fix: switch the affected monitor to the dock’s DisplayPort output if available. If HDMI is the only option, check for dock firmware updates specifically mentioning “HDCP 2.3 compliance” or “macOS Sequoia compatibility.”
The Symptom: The OS detects the monitor—it appears in display settings, you can select resolutions—but the physical screen remains black, flickers, or flashes on/off.
The Diagnosis: This is a handshake failure. The introduction happened, but the contract terms (resolution, timings, HDR) couldn’t be agreed upon. The docking station is telling the OS, “I see a monitor,” but the monitor is saying, “I don’t understand the signal you’re sending.” In practice, this is why users experience a docking station not detecting a monitor correctly, even though the OS shows the display.
Root Causes & Fixes:
- EDID (Extended Display Identification Data) Corruption: The monitor sends its capabilities via EDID. The docking station caches this data. A corrupted cache or faulty relay causes a mismatch. Fix: Power cycle everything: shut down, unplug the monitor and dock from power, wait 60 seconds, then power the monitor first, then the dock, then the laptop.
(EDID is defined by VESA Enhanced Display Data Channel Standard Version 1.3. The 128-byte data block contains native resolution, supported refresh rates, and color depth. Docks with internal MST hubs maintain a local EDID cache that can desync from the physical monitor after sleep states.) - HDR/Color Depth Mismatch: If HDR is enabled in Windows but the monitor or dock’s conversion chip doesn’t support it properly, the screen can go black. Fix: Boot with the monitor disconnected, disable HDR in Windows Settings > System > Display, then reconnect.
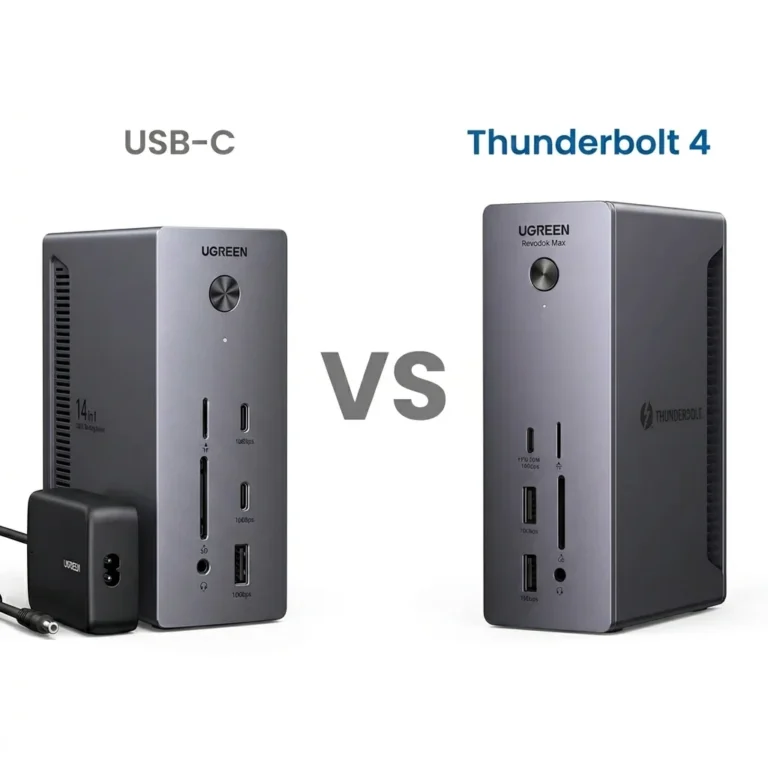
- Cable Bandwidth Ceiling: A low-quality HDMI cable might handshake at 4K@30Hz but fail when the OS tries to output 4K@60Hz, causing a black screen. Fix: Use a certified Premium High Speed HDMI cable or a certified DisplayPort cable. For a detailed breakdown of protocol limits, see our USB-C vs Thunderbolt 4 comparison.
Before swapping cables, check the ports themselves. Lint, dust, and oxidized contacts inside USB-C and HDMI ports cause the same detection failures as a bad cable — but cost nothing to fix. Our How to Clean a Thunderbolt Hub guide covers the full port cleaning process in under five minutes.
A Personal Anecdote: The Wake-from-Sleep Blackout
A client’s design team used a high-end docking station with dual 4K monitors—one via HDMI, one via DisplayPort. Every morning, the HDMI monitor would wake up black, while the DisplayPort monitor was fine. The issue was the dock’s internal controller failing to re-sync the HDMI converter chip after sleep. The fix wasn’t cable-related; it was a docking station firmware update that specifically addressed “HDMI handshake stability after S3 sleep.”
This highlights a unique insight: docking stations are more prone to EDID/handshake failures than direct connections because they add a third party (the dock’s controller) to the conversation, which can miscommunicate or corrupt the data flow.
This behavior is particularly common and stubborn on newer managed docks such as the Dell SD25TB4. In these designs, the dock’s internal MST controller firmware aggressively manages power states during sleep. If a connected monitor is slow to respond—or reports slightly non-standard EDID data—the dock can fail to re-initialize that display path on wake, leaving the screen dark even though the dock and operating system appear fully functional.
Dealing with Thunderbolt wake failures? Our Thunderbolt Docking Station Explained guide explains why TB4 doesn’t magically fix sleep issues — and how to pick a dock that handles them better.
Failure Class #3: Docking Station Only Detects One Monitor
The Symptom: You have a dual-monitor docking station, but only one screen activates. This is a critical high-intent pain point.
The Diagnosis: This is almost always a bandwidth allocation or MST topology failure within the docking station.
High-end Thunderbolt 5 docks like the CalDigit TS5 Plus approach this differently by exposing more downstream Thunderbolt ports and supporting simultaneous HDMI + DisplayPort routing. The trade-off is complexity: when pushing dual 4K at high refresh rates, the dock dynamically reallocates PCIe and DisplayPort bandwidth. If firmware, GPU drivers, or cable integrity are even slightly unstable, the second monitor is often the first to fail detection. In these scenarios, the issue is rarely raw bandwidth — it’s timing and negotiation tolerance.
The Technical Reality:
- Windows: Requires full GPU driver support for MST. Some older Intel integrated graphics drivers have buggy MST implementations. Updating to the latest generic Intel driver (not the OEM version) can resolve this.
(Intel confirmed MST display topology issues in integrated graphics drivers prior to version 31.0.101.4575. Affected: 10th and 11th gen Intel Core with outdated OEM driver packages. Source: Intel Graphics Driver Release Notes, DCH 31.0.101.4575) - macOS: Has a fundamental architectural limitation. macOS does not support DisplayPort MST for extending displays. A multi-monitor docking station on a Mac will only mirror to all outputs unless it uses a unique hardware workaround (like DisplayLink software drivers) or the Mac has multiple discrete display controllers (like M2 Pro/Max chips). This is why a user might find their docking station not detecting a monitor beyond the first on an Apple Silicon Mac.
(Confirmed by Apple: macOS does not support Multi-Stream Transport (MST) for extending displays via DisplayPort. This is an architectural limitation of Apple’s display subsystem, not a dock compatibility issue. Source: Apple Support HT204351 — “Use multiple displays with your Mac”)
Mac users hitting this limit need to understand which chip they have before buying any dock. Base M1/M2 are locked to one display regardless of dock. M3 Air unlocks a second display in clamshell mode only. M1 Pro/Max and newer support dual displays natively. We mapped every chip against its dock requirements in MacBook Docking Station: What Apple Doesn’t Tell You.
🟡 Pattern Check — Is This a Setup Problem or a Dock Problem?
You’ve power-cycled. You’ve updated firmware. The monitor still won’t detect. Before replacing the dock, run this check.
| It’s a setup problem if… | It’s a dock problem if… |
|---|---|
| Monitor works when plugged directly into the laptop | Monitor fails on the dock with multiple cables tested |
| Full power cycle fixes it for days or weeks | Power cycle fixes it for hours, then fails again |
| Problem started after an OS or driver update | Problem present since day one on any host laptop |
| Second monitor detects fine, only one fails | No monitors detect regardless of port or cable used |
If you’re in the right column consistently, the dock’s display controller is the failure point — not your setup. For a full breakdown of how dock display architecture differs from a direct connection, see our Laptop Docking Stations Explained guide.
Failure Class #4: HDMI vs DisplayPort vs USB-C Outputs
2026 Update
Thunderbolt 5 HDMI Routing Limitation
First-generation Thunderbolt 5 docks (2024–2025) introduced a new failure mode not present in TB4: HDMI and DisplayPort outputs sharing a single video tunnel. On docks like the Anker Prime Thunderbolt 5, using both HDMI and DisplayPort simultaneously causes one output to go dark — not because of bandwidth, but because the routing architecture only supports one active video protocol at a time per tunnel. This is a hardware design choice, not a firmware bug. Fix: use two DisplayPort outputs if your dock supports it, or use a single HDMI + single DP with full awareness that one must remain primary.
Not all video outputs on a docking station are created equal. Their inherent technical differences dictate common failure modes.
- HDMI Failures: HDMI is a consumer audiovisual protocol. The docking station must actively convert the internal DisplayPort signal to HDMI.
(Thunderbolt and USB-C carry DisplayPort natively — there is no native HDMI tunneling in Thunderbolt 4 or USB4. Every HDMI port on a dock requires an active DP-to-HDMI conversion chip. Source: Intel Thunderbolt 4 Specification, DisplayPort 1.4 Alt Mode over USB-C Specification v1.0)- Common Failure: HDMI 1.4 vs 2.0 Confusion. A dock may have an HDMI 2.0 port, but if its internal converter chip or firmware is limited to HDMI 1.4 specs, it will fail at 4K@60Hz, defaulting to 4K@30Hz or causing a black screen. This is often the root cause when a docking station monitor not working issue is resolution-dependent.
This conversion layer is exactly where conservative Thunderbolt 5 designs and aggressive ones diverge. For example, the Anker Prime Thunderbolt 5 Dock intentionally routes HDMI and DisplayPort through a shared video tunnel, meaning HDMI and DP cannot operate simultaneously. This is not a bug — it is a routing limitation designed to preserve signal stability under high refresh rates. If you’re troubleshooting HDMI failure on that dock, verify you’re not attempting to use both HDMI and DisplayPort at the same time.
- DisplayPort Failures: DisplayPort is the native language of computer displays and what travels through Thunderbolt.
- Common Failure: MST (Multi-Stream Transport) Dependency. Driving two monitors from one DisplayPort output on a dock requires MST. If the dock’s MST hub is disabled or buggy, the second monitor fails. This is intrinsically linked to the concepts in our Thunderbolt Daisy Chaining Not Working guide.
- USB-C Monitor Failures: A USB-C port on a dock can output DisplayPort Alt Mode.
- Common Failure: Power/Video Contention. The port may be trying to provide power to a device (like a phone) while also receiving video from the laptop, causing conflict. Ensure the connected USB-C monitor is set to receive power, not provide it.
Failure Class #5: Works Directly, Fails Through Dock
2026 Update
USB4 v2 Display Detection Failures
USB4 Version 2.0 (80Gbps) laptops shipping in late 2024–2025 (Intel Lunar Lake, AMD Strix Point) expose a new compatibility gap: TB4 docks were not designed to negotiate USB4 v2 tunneling protocols. Some TB4 docks fail to detect displays entirely when connected to USB4 v2 hosts, even though the connection is backward-compatible on paper. Fix: update your dock to the latest firmware — most TB4 dock manufacturers pushed compatibility patches in Q4 2024. If the dock firmware is current and detection still fails, connect through the laptop’s Thunderbolt port specifically (not a generic USB4 port if your laptop has both).
The Symptom: Your monitor works perfectly when connected directly to your laptop’s HDMI or USB-C port but fails when connected through the docking station.
The Diagnosis: This isolates the fault squarely to the docking station’s display routing or conversion layer. The dock is degrading or failing to pass through the signal. This scenario almost always confirms a docking station not detecting a monitor properly at the conversion layer, not a cable or GPU failure.
Root Causes:
- Signal Re-driving Failure: The dock isn’t just a cable extender; it receives, re-clocks, and re-transmits the video signal. A faulty or underpowered component here can corrupt the output.
- Dual-Hop Conversion: If you’re connecting an HDMI monitor to a dock’s USB-C port using an adapter, you’ve created a dual-conversion chain (DP in dock -> USB-C Alt Mode -> adapter -> HDMI). Each conversion adds a point of failure. Solution: Use the dock’s native HDMI port.
- Insufficient Power to Dock’s Display Controller: If the dock’s power supply is under-rated or failing, the display controller may be the first component to brown out. This can be related to broader power issues, as explored in our guide on Docking Station Not Charging Laptop problems.
If the dock uses DisplayLink: DisplayLink Manager must be installed and active — the dock will appear connected but output no signal without it.
Diagnostic Flowchart: From Black Screen to Working Display
When a docking station is not detecting a monitor, stop guessing and isolate the failure layer methodically.

- Test the Monitor & Cable Directly: Connect the monitor directly to your laptop with the same cable. If it works, the problem is the docking station or its setup. If it fails, the issue is the cable or monitor.
- Verify the Correct Dock Port: Ensure your laptop is connected to the dock’s designated host input port (usually marked).
- Perform a Full Power Cycle: Shut down the laptop. Unplug the docking station and monitor from power for 60 seconds. Power the monitor on first, then the dock, then the laptop.
- Reset Display Settings on OS:
- Windows: Press
Win + Ctrl + Shift + Bto reset the graphics driver. Then, go to Settings > System > Display > Multiple Displays > “Detect.”
(This key combination triggers a TDR — Timeout Detection and Recovery — on the Windows Display Driver Model (WDDM). It forces the GPU driver to re-enumerate connected displays without a full reboot. Source: Microsoft WDDM documentation, Windows Driver Kit) - macOS: Boot in safe mode (hold Shift during startup) to flush caches, then restart normally.
- Windows: Press
- Check for Firmware/Driver Updates: Update your docking station’s firmware via the manufacturer’s tool. Update your laptop’s GPU drivers from Intel/AMD/NVIDIA directly.
- BIOS/UEFI Check: Enter BIOS and ensure DisplayPort/Thunderbolt display output is enabled.
🔴 Last Resort Protocol — When to Stop Troubleshooting and Replace
If you’ve worked through every failure class in this guide and the monitor still won’t detect, stop troubleshooting. The dock’s display controller has failed or was never compatible with your setup.
Replace your dock if:
- ✅ Monitor fails to detect on two different laptops through the same dock
- ✅ All cables tested, all ports tested — no combination works
- ✅ Firmware is current and OS is fully updated — still no detection
- ✅ Direct laptop-to-monitor connection works fine with the same cable
Rule of thumb: If the dock fails the direct comparison test — works direct, fails through dock — the dock is not repairable through software. It needs to be replaced.
When replacing, prioritize docks with active firmware maintenance and native DisplayPort outputs. The comparison table below shows which docks have the best real-world detection reliability across Windows and macOS.
Not sure which dock fits your setup? Compare all 81 docking stations side by side — filter by connection type, displays, power delivery, and OS in our Docking Station Comparison Tool.
When the Dock Is NOT the Problem
Sometimes, the docking station is merely the messenger. The real culprits are:
- GPU Driver Corruption: A clean reinstall of graphics drivers is more effective than an update.
- Operating System Updates: A recent OS update may have changed display stack behavior. Check update history.
- Monitor Firmware Bugs: High-end monitors (e.g., Dell Ultrasharp, LG UltraFine) receive firmware updates that fix compatibility. Check the monitor’s on-screen menu or manufacturer’s website.
- Power Negotiation Side-Effects: As covered in our charging guide, a faulty power handshake can destabilize the entire dock, including its display controller.
Comparison Table
Our pick for display detection reliability: The CalDigit TS4 has the most actively maintained firmware of any Thunderbolt 4 dock on the market. When Windows 11 or macOS updates break display detection, CalDigit pushes a fix faster than any competitor. If monitor detection failures brought you to this guide — this is the dock that ends them.
Which Dock Handles Monitor Detection Best?
CalDigit TS4
Thunderbolt 4 · Fanless · 2.5GbE · 98W PD
- Dual 6K (M1 Pro/Max/Ultra) · Dual 4K@60Hz (Windows) · ⚠️ Single display on base M1/M2/M3
- 2x downstream TB4 ports
- 2x TB4, 3x USB-C, 5x USB-A (18 ports total)
- Mac: ✅ Native — best Mac compatibility of any TB4 dock
- Detection: ⭐ Excellent — most reliable, fastest firmware updates on OS changes
Most actively maintained firmware. Fastest fix turnaround on OS updates. First choice if monitor detection is your pain point.
Check Price →Kensington SD5780T
Thunderbolt 4 · 2.5GbE · 96W PD
- Dual 4K@60Hz
- 2x downstream TB4 ports
- 4x USB-A, 3x TB4 (2 downstream)
- Mac: ✅ Native
- Detection: Excellent — strong enterprise track record
Reliable enterprise dock. If CalDigit is out of budget or stock, this is the next safest pick for detection stability.
Check Price →Plugable TBT4-UDZ
Thunderbolt 4 · 2.5GbE · 100W PD
- 4x 4K displays via Windows MST
- 0x downstream TB4 ports — no daisy chaining
- 6x USB-A, 1x USB-C
- Mac: ⚠️ Dual on M1 Pro/Max only · Single on base M1/M2
- Detection: Good — MST-dependent, more failure points than native TB4
Best for Windows quad-monitor setups. Skip if you’re on Mac — no downstream TB4 means no workaround for Apple’s display limits.
Check Price →UGREEN Revodok Max 213
Thunderbolt 4 · Passive · 2.5GbE · 90W PD
- Dual 4K@60Hz · 1x DP 1.4 + 2x TB4 downstream (no HDMI)
- 2x downstream TB4 ports
- 2x USB-A 10Gbps, 2x USB-A 5Gbps, 1x USB-C · SD/TF 4.0
- Mac: ⚠️ M1 Pro/Max only — base M1/M2 = single display
- Detection: Good — ⚠️ runs hot under sustained load (55–60°C), throttles
Solid spec sheet at the price, but thermal throttling under load can cause intermittent detection drops. Best for light-to-moderate workloads.
Check Price →Dell WD22TB4
Thunderbolt 4 · 1GbE · 130W PD (Dell) / 90W
- Dual 4K@60Hz · up to 4 displays (GPU dependent) · 2x DP 1.4 + 1x HDMI 2.0
- 2x downstream TB4 ports
- 3x USB-A, 2x USB-C, 2x TB4
- Mac: ✅ Certified — but 130W PD only for Dell laptops
- Detection: ⚠️ Conditional — requires Dell DCM firmware tool, detection failures common on non-Dell hosts
Best value TB4 dock if you’re running Dell laptops. Detection issues are well-documented on non-Dell hosts — budget Dell fleet only.
Check Price →Dell SD25TB4
Thunderbolt 4 · 2.5GbE · 130W PD (Dell) / 96W
- 4x 4K@60Hz · 2x 6K · 1x 8K · 2x DP 1.4 + 1x HDMI 2.1
- 2x downstream TB4 ports
- 4x USB-A 3.2 Gen2, 1x USB-C 3.2 Gen2, 2x TB4
- Mac: ⚠️ Supported with limitations — 🔒 Dell-only reliable
- Detection: 🔒 Dell-only reliable — full remote management + Wi-Fi OOB
Dell’s enterprise flagship. Unmatched remote management and display capacity — but locked to the Dell ecosystem. Don’t buy for non-Dell laptops.
Check Price →Need help matching a dock to your exact laptop? Use our interactive dock comparison tool →
If the UGREEN Revodok Max 213 is on your shortlist, it’s worth knowing how it stacks up against the Pro 314 before committing. Display output behavior differs between the two — including Mac limitations that directly affect monitor detection. See the full UGREEN Revodok Max 213 vs Pro 314 comparison.
When DisplayPort Is the Only Correct Answer
After diagnosing thousands of these failures, my professional, opinionated recommendation is this: For computer-to-monitor connections, prefer DisplayPort whenever possible.
Why? It eliminates the most common point of failure: active signal conversion. A USB-C to DisplayPort cable is typically a passive adapter; it directly maps the DisplayPort signals from the laptop through the dock to the monitor. HDMI, by contrast, always requires an active conversion chip inside the docking station, which can overheat, fail to negotiate, or be limited by version mismatches. If your monitor has both HDMI and DisplayPort, investing in a quality DisplayPort cable will make your docking station setup more reliable.
(A USB-C to DisplayPort cable using Alt Mode is electrically passive — it maps DP lanes directly with no active conversion chip. HDMI always requires active conversion from the DP signal source. Source: VESA DisplayPort Alt Mode on USB Type-C Standard v2.0)
FAQ
Why You Can Trust This Guide
We don’t review docking stations.
We analyze failure patterns.
This guide is based on real-world behavior observed across:
- multi-monitor workstation setups
- enterprise laptop deployments (Dell, Lenovo)
- repeated HDMI, DisplayPort, and USB-C failure cases
If a fix appears here, it’s because it has failed in the real world—consistently.
Our focus is not specs. It’s what breaks, why it breaks, and how to restore stability.
Professional Work History & ByrdPilot Expertise

Alex Atkinson — Docking Infrastructure Specialist
Author of our core docking station problem-solving guides, including the UGREEN vs CalDigit comparison and the guide on Docking Station Not Charging Laptop.

Hans Pedersen — Display Topology Specialist
Our specialist in display protocols and topology, author of the definitive guides on Thunderbolt Daisy Chaining Not Working and OS-specific daisy chain issues.

Yamato Nakamura — Storage & Thermal Infrastructure Specialist
Our storage systems architect, who details complex failure modes in guides like NAS Problems Explained. Yamato cross-validates every thermal measurement and stress test published on ByrdPilot.
At ByrdPilot, we don’t write in silos. We write as a systems practice — cross‑validated by specialists who have diagnosed these failures in real deployments. Experience > spec sheets. Always.