MacBook Docking Station: What Apple Doesn’t Tell You
⚡ Quick Answer — MacBook Docking Station
The best macbook docking station depends entirely on your chip. Base M1 and M2 MacBook Air are hardware-limited to one external display — no dock changes that. M3 MacBook Air supports one display with the lid open, and two displays in clamshell mode. M1 Pro through M4 Max support dual external displays natively via a Thunderbolt 4 dock. M4 and M5 base — verify at Apple’s specs page for your exact model. Top pick for any mac docking station setup: CalDigit TS4 — natively compatible, fanless, 98W charging, dual 4K on Pro/Max chips. If your second monitor stays black, check your chip before blaming the dock.
You bought a macbook docking station. You plug in two monitors. One works. The other stays black. You swap cables. You try different ports. Nothing. Then you Google it and find out Apple quietly limits your chip to one external display — and your $300 dock can’t do anything about it.
This is the most common MacBook dock failure — and it’s not a failure at all. It’s a hardware limit Apple buries in a footnote. This guide explains exactly which chips support what, which docks work natively on macOS, and what to do if your setup hits a wall.
🟢 Early Bird — Shopping for a MacBook Docking Station?
A macbook docking station rewards informed buyers and punishes impulse purchases. The difference between a dock that works flawlessly and one that leaves your second screen black comes down to one thing — your chip.
Before you buy, ask yourself:
- Do you have a base M1 or M2 Mac? → single display only. No dock can bypass that hardware limit.
- Do you have an M3 MacBook Air? → one display with lid open, two displays in clamshell mode. A TB4 dock unlocks both scenarios.
- Do you have an M4 or M5 Mac? → verify display support at Apple’s specs page before buying.
- Do you need dual monitors with lid open? → you need M1 Pro/Max or newer confirmed. No workaround exists for base M1/M2.
- How much power does your MacBook draw? → Air: 65W, Pro 14″: 96W, Pro 16″: 140W. Dock wattage must match or your battery drains under load.
For everyone else, the comparison table below shows exactly which mac docking station matches your setup.
Not sure which dock fits your setup? Compare all 81 docking stations side by side — filter by connection type, displays, power delivery, and OS in our Docking Station Comparison Tool.
1. The Display Limit Apple Doesn’t Publish
The single most important factor when choosing a macbook docking station isn’t the dock — it’s your chip. Apple doesn’t advertise display limits clearly, but the output engine is baked into the silicon. M1 and M2 base chips are locked to one external display. M3 Air changed the rules — one display with the lid open, two in clamshell. Check the table below for your exact chip.
| MacBook Chip | External Displays | Best Dock Type |
|---|---|---|
| M1 (Air, 13″ Pro) | 1 max — hardware limit | TB4 dock (single display + peripherals) |
| M2 (Air, 13″ Pro) | 1 max — hardware limit | TB4 dock (single display + peripherals) |
| M3 Air | 1 (lid open) / 2 in clamshell ⚠️ | TB4 dock — close lid for dual display |
| M4 (Air) | Verify at Apple specs page* | TB4 dock |
| M5 (Air) | Verify at Apple specs page* | TB4 dock |
| M1 Pro / M1 Max | Dual 4K@60Hz native | TB4 dock |
| M2 Pro / M2 Max | Dual 4K@60Hz native | TB4 dock |
| M3 Pro / M3 Max | Dual 4K@60Hz native | TB4 dock |
| M4 Pro / M4 Max | Dual 4K@60Hz native | TB4 dock / TB5 |
| M5 Pro / M5 Max | Dual display native | TB5 dock |
⚠️ M3 Air confirmed by Apple: 1 external display lid open, 2 external displays in clamshell (second up to 5K@60Hz). M4 and M5 base — check apple.com/macbook-air/specs/ for your exact model before purchasing.
M1 and M2 base-chip MacBook Air users who need a second display can work around the hardware limit using a DisplayLink dock — the DisplayLink Manager app handles the second output over USB.
How to identify your chip: Apple menu → About This Mac → Chip.
The DisplayLink workaround: Base M1 and M2 users can run dual displays using a DisplayLink dock — but it uses CPU compression, adds latency, and isn’t suitable for video editing or colour-critical work. M3 Air users don’t need DisplayLink — just close the lid.

If your monitor isn’t being detected even though your chip supports dual displays, start with our Docking Station Not Detecting Monitor guide.
2. What to Check Before Buying a MacBook Docking Station
Before you spend $300 on a macbook docking station, run through these four steps. A mac docking station can’t override your laptop’s hardware.
Step 1 — Identify Your Chip
Apple menu → About This Mac. Write down the exact chip name. If it says “M1,” “M2,” or “M3” (no Pro/Max suffix), you’re limited to one external display. M4 base — verify at Apple’s specs page.
Step 2 — Count Your Thunderbolt Ports
- MacBook Air M1/M2/M3/M4: 2x Thunderbolt ports (left side)
- MacBook Pro 14″/16″: 3x Thunderbolt ports
- MacBook Pro 13″ (M1/M2): 2x Thunderbolt ports
Step 3 — Decide Your Display Goal
- Single 4K + peripherals → any TB4 dock works
- Dual 4K → need M1 Pro/Max or newer + TB4 dock
- Dual 4K@144Hz → TB5 dock + M4 Pro/Max
Step 4 — Power Delivery Needs
- MacBook Air: 30–70W under load
- MacBook Pro 14″: up to 96W under full load
- MacBook Pro 16″: up to 140W under full load
Rule: Your dock must deliver at least your laptop’s rated wattage, or the battery will drain during heavy use.
3. Thunderbolt Dock vs USB-C Hub for MacBook: Which Do You Actually Need?
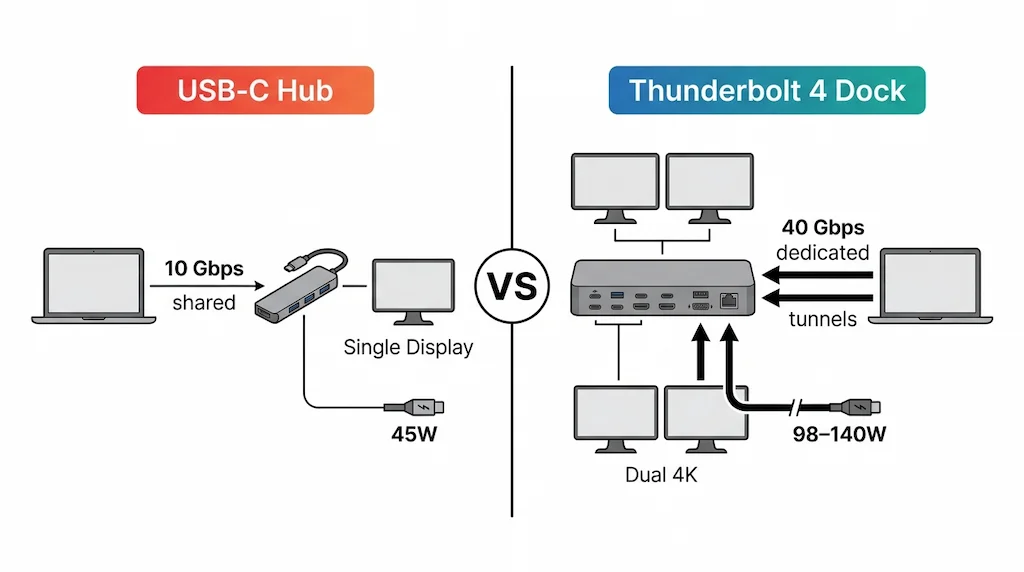
Most MacBook users shopping for a dock are choosing between two completely different product categories — and the marketing doesn’t help. A USB-C hub and a Thunderbolt dock look similar, cost differently, and perform nothing alike. Here’s what the spec sheet doesn’t tell you.
| Feature | USB-C Hub | Thunderbolt 4 Dock |
|---|---|---|
| Bandwidth | 10–20 Gbps — shared across all ports | 40 Gbps — dedicated tunnels for display, data, USB |
| Charging | 30–65W — fine for Air, insufficient for Pro 16″ | 96–140W — full PD for all MacBook models |
| Displays | Single display, resolution depends on GPU | Dual 4K@60Hz on Pro/Max chips — guaranteed |
| Ethernet | Usually 1GbE — shared with USB bandwidth | 2.5GbE standard — dedicated lane |
| External Storage | Shared USB bandwidth — SSD slows under display load | PCIe tunneling — storage doesn’t compete with display |
| Sleep/Wake | Inconsistent — depends on hub firmware | Reliable — TB4 certification requires wake support |
| Price | $30–100 | $200–400 |
Buy a USB-C Hub if:
- You have a MacBook Air and need one external display + a few USB ports
- Your workload is light — browsing, writing, video calls
- You don’t run external NVMe drives
- Budget is the primary constraint
Buy a Thunderbolt Dock if:
- You have a MacBook Pro with Pro/Max chip and need dual monitors
- You run external NVMe SSDs alongside displays — shared USB bandwidth will throttle a hub
- You need reliable 2.5GbE Ethernet for video calls or large transfers
- Your MacBook Pro 14″ or 16″ needs 96W+ charging through the dock
- You work in clamshell mode for hours — TB4 sleep/wake is significantly more reliable
The honest answer: if you have a MacBook Air doing light work, a $50 USB-C hub does the job. If you have a MacBook Pro and you’re asking this question, you probably need a Thunderbolt dock — a hub will show its limits within weeks.
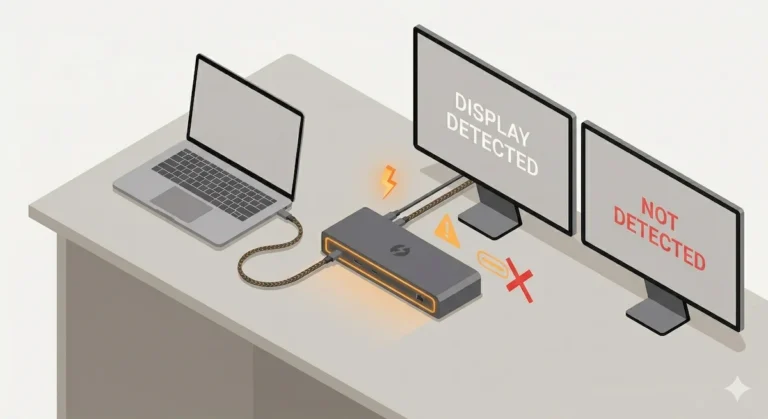
🟡 Pattern Check — Is Your Dock the Problem, or Your Mac?
You’ve followed the setup steps. Updated macOS. Swapped cables. Something still isn’t right. Before you buy a replacement dock, run this check.
| You’re fixing configuration if… | You’re hitting a hardware limit if… |
|---|---|
| Problem started after a macOS update | M1/M2 base chip — one display limit, no fix exists |
| Display flickers but dock is detected | Dock delivers 90W to a 16″ MacBook Pro needing 140W |
| Wrong Thunderbolt port used on dock | Non-certified cable that can’t handle 40Gbps |
| Dock firmware outdated | Dock doesn’t support macOS natively |
Thunderbolt 5 docks eliminate bandwidth constraints for M4 Pro/Max and M5 MacBooks — dual 4K@144Hz, 140W charging, no MST compromises. Built to last through the decade.
For model-specific diagnostics, see our Thunderbolt 5 cluster: CalDigit TS5 Plus • Anker Prime TB5 • Kensington SD7100T5 • iVANKY FusionDock Max 2 • Razer Thunderbolt 5 Chroma
4. Does Your MacBook Docking Station Work in Clamshell Mode?
Clamshell mode — MacBook lid closed, dock connected, external display active — is the most popular way to use a MacBook as a desktop replacement. It works on every chip, but what you get depends on which chip you have.
M1 and M2 MacBook Air — one external display in clamshell. Same limit as lid open. The dock handles all peripherals cleanly but you don’t gain a second screen by closing the lid.
M3 MacBook Air — this is where clamshell matters most. Apple confirmed: close the lid and you get two external displays (first up to 6K@60Hz, second up to 5K@60Hz). This is the only way to run dual monitors on an M3 Air without a Pro/Max chip. A TB4 dock with 65W+ charging is all you need.
M1 Pro/Max and newer — dual displays work with lid open or closed. Clamshell is a desk preference, not a capability unlock.
Two requirements for clamshell to work:
- Power — your dock must deliver enough wattage. Air needs 65W minimum. MacBook Pro 14″ needs 96W. MacBook Pro 16″ needs 140W. An underpowered dock will put the Mac to sleep when you close the lid.
- External input — connect a keyboard and mouse before closing the lid. macOS won’t activate clamshell without an external input device.
To enter clamshell: Connect dock → connect display(s) → connect keyboard and mouse → close lid. External display activates within seconds.

If your MacBook won’t wake in clamshell, the dock is underpowered — not broken. Check wattage before replacing anything.hell, the dock is underpowered — not broken. Check the wattage before replacing anything.
Getting dual monitors working on a MacBook Pro is half the equation — picking the right dock for your resolution target is the other half. Thunderbolt 4 guarantees dual 4K@60Hz, but bandwidth math, MST behavior, and cable quality all affect whether the second screen actually holds a stable signal. We mapped every failure pattern in Docking Station for Dual Monitors: What Actually Works.
For tested dock picks by MacBook Pro chip generation, see Best Docking Station for MacBook Pro (2026) →
5. Best MacBook Air Docking Station (M1, M2, M3 Base — M4 Is Different)
M1 and M2 MacBook Air — hardware-limited to one external display regardless of dock. No workaround through Thunderbolt.
M3 MacBook Air — one display with lid open. Close the lid and you get two external displays (up to 6K + 5K). A TB4 dock makes this work cleanly.
M4 and M5 MacBook Air — verify display support at Apple’s specs page for your exact model.
The docks below are chosen for single display + maximum peripheral expansion — the primary use case for Air users with the lid open. M3 Air users: see the clamshell section below for dual display setup.
What matters for a macbook air docking station setup:
- Single 4K@60Hz via Thunderbolt (or dual in clamshell on M3+)
- 65–96W charging (Air pulls 30–70W, so 65W is fine)
- USB-A expansion (Air has only 2 TB ports)
- Ethernet, SD card reader (optional but useful)
- Compact form factor — a large dock next to an Air looks out of place
3 Top Picks for MacBook Air:
- CalDigit TS4 — best overall. Full Mac compatibility, 98W, fanless, 18 ports. Overkill for an Air but future-proof if you upgrade to a Pro later.
- Plugable TBT4-UDZ — best value. 100W, 6x USB-A for peripheral-heavy setups. Works natively with Air on single display.
- UGREEN Revodok Max 213 — budget pick. Single display means thermal limits are less critical on an Air. Around $80 cheaper than the TS4.
→ For spec-verified picks, a full comparison table, and buying advice by chip: Best Docking Station for MacBook Air (2026): 6 Tested Picks →
The three macbook air docking station picks above cover the full range — maximum ports, best value, and lowest cost. Understanding why daisy chaining fails on macOS is essential if you’re trying to connect multiple monitors through a single port. Read Daisy Chain Not Working on Mac for the full explanation.
6. Best MacBook Pro Docking Station (M1 Pro/Max through M4 Pro/Max)
If you have a MacBook Pro with a Pro or Max chip, you can run dual external displays natively. No DisplayLink, no driver hacks. A macbook pro docking station simply extends what your chip already supports. Every macbook pro docking station below is verified Mac-native — no driver installation required.
CalDigit TS4
TB4 · Fanless · 98W · 2.5GbE
- 🟢 Dual 4K@60Hz on Pro/Max chips
- 98W PD — charges 14″ MacBook Pro under load
- 18 ports, 2x TB4 downstream
- Native Mac support — no driver needed
The gold standard. Works out of the box, no tinkering.
Check Price →Kensington SD5780T
TB4 · Active Fan · 96W · 2.5GbE
- 🟢 Dual 4K@60Hz — fan prevents thermal throttling
- 96W PD — stable for 24/7 operation
- Physical security lock built-in
- Native Mac compatibility
Best for sustained loads — video editing, trading desks, always-on setups.
Check Price →Plugable TBT4-UDZ
TB4 · Passive · 100W · 2.5GbE
- 🟢 Dual 4K@60Hz on M1 Pro/Max and newer
- 100W PD — consistent across hosts
- 6x USB-A ports — highest USB-A count in TB4
- Good Mac compatibility (M1 Pro/Max required for dual)
Best balance of price and performance for MacBook Pro.
Check Price →UGREEN Revodok Max 213
TB4 · Passive · 90W · 2.5GbE
- ⚠️ Dual 4K@60Hz on M1 Pro/Max only
- 90W PD — thermal ceiling under sustained load
- Base M1/M2/M3 → single display only
- Cheapest TB4 entry to dual-display on MacBook Pro
Budget pick with trade-offs. Know its thermal ceiling.
Check Price →CalDigit TS5 Plus
TB5 · Passive · 140W · 10GbE
- 🟢 Dual 4K@144Hz on M4 Pro/Max
- 140W PD — charges 16″ MacBook Pro under full load
- 10GbE Ethernet — fastest networking in class
- Native Mac support (macOS Sequoia 15.3+ for full TB5)
Best for M4 Pro/Max MacBooks. Overkill for older chips.
Check Price →Anker Prime TB5
TB5 · Active Fan · 140W · 2.5GbE
- 🟢 Dual display on M4 Pro/Max
- 140W PD — active cooling, runs cooler than passive TB5
- Conservative firmware — fewer macOS wake bugs
- Requires macOS 15+ for full TB5 support
Best compact TB5 for MacBook Pro. Quiet fan, reliable sleep/wake.
Check Price →7. How to Set Up a MacBook Docking Station
Setting up a macbook docking station is straightforward — but the order matters. The sequence below applies to every mac docking station regardless of brand.
Step 1 — Identify your port
Use the left‑side Thunderbolt port on MacBook Air. On MacBook Pro, use the ports on the MagSafe side (left) for best bandwidth.
Step 2 — Connect power adapter first
Plug the dock into its power adapter before connecting it to your MacBook. This forces a clean Thunderbolt handshake.
Step 3 — Connect host cable to MacBook
Use the included Thunderbolt cable. Third‑party cables must be certified TB4. Cheap USB‑C cables will cause detection failures.
Step 4 — Update macOS before configuring
System Settings → General → Software Update. Outdated macOS is a common cause of dock detection failures. macOS Sequoia 15.3+ fixed several TB4 sleep/wake issues.
Step 5 — Configure display in System Settings
System Settings → Displays → click the external display → set to “Use as Extended Display” (not Mirror). For base M1 and M2 chips: only one external display will appear regardless of how many monitors are connected — that’s the hardware limit, not a dock problem. M3 Air users: close the lid first, then configure both external displays in System Settings.
If your Mac shows Thunderbolt Bridge as connected but no network appears, that’s a separate driver issue — the Thunderbolt Bridge Not Connected guide covers the Mac-specific fix sequence
Many MacBook dock failures that look like firmware or driver issues are actually thermal and contamination problems. Passive docks like the CalDigit TS4 and UGREEN Max 213 rely entirely on airflow — dust buildup on the vents accelerates throttling and disconnects. If your dock runs consistently hot or drops connections under normal load, cleaning is the first step before replacing anything. We wrote a full maintenance protocol in How to Clean a Thunderbolt Hub.
8. MacBook Docking Station Comparison Table
| Dock | Protocol | Mac Display Support | Charging | Ethernet | Mac Compatibility |
|---|---|---|---|---|---|
| CalDigit TS4 | TB4 | Dual 4K (Pro/Max) / Single (base) | 98W | 2.5GbE | ⭐ Native |
| Kensington SD5780T | TB4 | Dual 4K (Pro/Max) / Single (base) | 96W | 2.5GbE | Native |
| Plugable TBT4-UDZ | TB4 | Dual (M1 Pro/Max) / Single (base M1/M2/M3) | 100W | 2.5GbE | Good |
| UGREEN Revodok Max 213 | TB4 | Single only on base / ⚠️ M1 Pro/Max only | 90W | 2.5GbE | ⚠️ M1 Pro/Max only |
| CalDigit TS5 Plus | TB5 | Dual 4K@144Hz (Pro/Max) | 140W | 10GbE | Native |
| Anker Prime TB5 | TB5 | Dual display (Pro/Max) | 140W | 2.5GbE | macOS 15+ |
9. Common MacBook Docking Station Problems
| Symptom | Likely Cause | Next Step |
|---|---|---|
| Second monitor not showing | M1/M2 base → 1 display limit. M3 Air → close lid for dual. | Check chip first. If Pro/Max, see Docking Station Not Detecting Monitor |
| Dock not recognized after sleep | macOS Thunderbolt power-state desync | Thunderbolt Dock Not Detected |
| MacBook not charging through dock | PD mismatch or wrong port | Docking Station Not Charging Laptop |
| Random disconnects | Thermal or cable issue | Docking Station Keeps Disconnecting |
| Dock detected but display flickers | HDR enabled or wrong TB port | Disable HDR in Display Settings. Use top-left TB port on dock. |
| Mac won’t wake in clamshell | Dock underpowered or no external input | Check dock wattage (65W+ for Air, 96W+ for Pro 14″). Connect keyboard/mouse before closing lid. |
For a complete system-level diagnostic, start with our Docking Station Not Working guide.
🔴 Last Resort — When to Replace Your MacBook Dock
You’ve tried everything. macOS updated, firmware current, certified cable, correct port. Still failing. Stop troubleshooting.
Replace your macbook docking station if:
- ✅ A specific port fails with every cable and monitor tested
- ✅ Dock fails on two different MacBooks with the same chip family
- ✅ Firmware current, macOS updated, correct port — still drops signal
- ✅ Dock runs hot at idle or smells burnt
Rule of thumb: If the dock works on a Pro/Max MacBook but not on a base Air — the problem is the chip, not the dock. Replace the computer, not the accessory.
Not sure which dock fits your setup? Compare all 81 docking stations side by side — filter by connection type, displays, power delivery, and OS in our Docking Station Comparison Tool.
10. FAQ
📚 Sources & References
- Thunderbolt 4 vs USB4 vs USB-C protocol and certification differences — BenQ Knowledge Center
- Thunderbolt 5 bandwidth and architecture overview — Digital Trends
- Multi-Stream Transport and display detection on Mac vs Windows — Plugable Knowledge Base
- DisplayPort over USB-C and alternate mode signaling — DisplayPort Association
- USB Power Delivery specification and charging negotiation — Plugable Technologies
About the Author

Alex
Senior Technical Writer & Infrastructure Consultant, ByrdPilot.com
I don’t review docks. I diagnose why they fail — in creative studios, corporate fleets, and home offices where a dropped connection costs real time. The MacBook display limit is the most misunderstood spec in consumer tech. Engineers buy $300 docks, blame them for a $0 hardware constraint baked into the chip.
This guide is built from real-world Mac deployments across design studios and enterprise environments. Display topology and MST behavior on macOS is validated with Hans Pedersen, ByrdPilot’s display systems specialist. Power delivery and thermal management review by Yamato.
Experience > spec sheets. Always.