How to Daisy Chain Monitors for a One-Cable Desk (2026 Guide)
What you need: A primary monitor with a DisplayPort OUT port, a docking station with MST (Multi-Stream Transport) support, and certified DisplayPort 1.2+ cables.
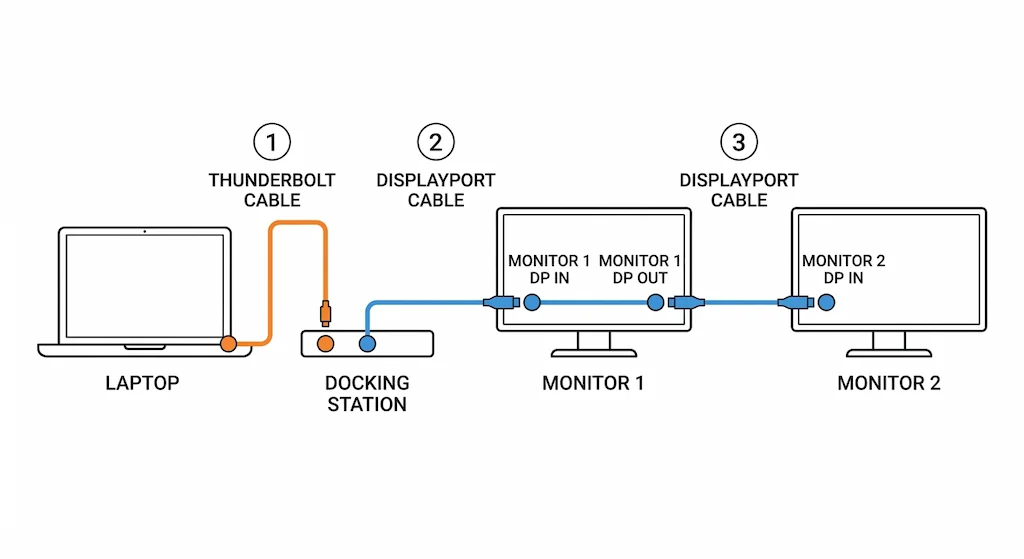
Connection order: Dock → Monitor 1 DP IN → Monitor 1 DP OUT → Monitor 2 DP IN. Power on in sequence: dock first, then Monitor 1, then Monitor 2, then laptop.
Why it fails: 90% of failures trace back to a monitor with no DP OUT port, or a dock without MST support. Verify both before touching a cable.
Bandwidth reality: One DisplayPort 1.2 connection handles dual 1080p or dual 1440p at 60Hz reliably. Dual 4K requires DisplayPort 1.4 and a confirmed MST dock like the CalDigit TS4.
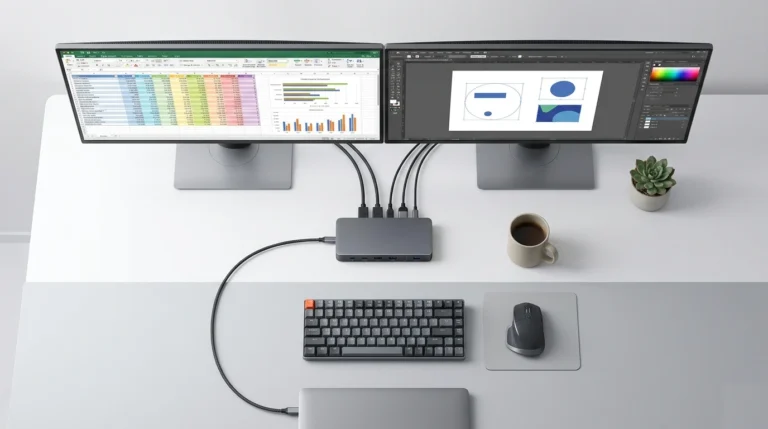
One cable from your docking station. Two monitors on your desk. No spaghetti.
That’s daisy chaining — and most people fail at it because they skip three hardware checks that make or break the entire setup before a single cable is plugged in.
I’ve deployed daisy-chain setups across trading floors, legal offices, and post-production studios. The failure pattern is always the same: wrong monitor, wrong dock, wrong connection order. This guide closes all three gaps. You’ll get the exact hardware checklist, the precise sequence, and the diagnostic tree when it stops working.
🟢 Early Bird — Haven’t Bought Yet? Check This Before You Spend Anything
Daisy chaining looks simple. It isn’t. Most setups fail before a single cable is plugged in because one core requirement is missing. Before you buy anything, ask yourself:
- Does my primary monitor have a DisplayPort OUT port — not just IN?
- Does my docking station explicitly state MST support in its specs?
- Am I trying to run dual 4K at high refresh with HDR? If yes, the bandwidth won’t support it.
If you fail any one of these, daisy chaining won’t work. The right path is two separate cables from your dock — same clean result, zero compatibility fights.
Check Comparison Table → Find My Dock in 60 Seconds →1. The Three-Lock Door: What You MUST Have Before Starting
You cannot force this to work. The desire to daisy chain monitors is defeated 90% of the time before a single cable is plugged in because a core requirement is missing. Treat these three points like a pre-flight checklist.
1.1 The Monitor’s Secret Door: A DisplayPort OUT Port
This is the single most common point of failure. To daisy chain monitors, your primary monitor (the first in the chain) must have a DisplayPort 1.2 or higher OUT port.
- The Inspection: Get up right now and look at the back of your main monitor. You are looking for two DisplayPort ports. One will be labeled “IN” (to get signal from your docking station). The other must be labeled “OUT” (to send signal to the next monitor). If you only see one DisplayPort port, your monitor cannot participate in a chain. It’s a dead end.
- The Reality: Most budget monitors and many gaming-focused panels only include an IN port. I learned this the hard way with a client’s beautiful new curved screen; we had to pivot to a dual-cable solution from their docking station.
1.2 The Brain in the Middle: A Dock with MST Support
Your docking station is not a dumb splitter. To daisy chain monitors, it must contain a specific chip that acts as a Multi-Stream Transport (MST) hub. This chip packages the video signals for both monitors into a single stream.
- Thunderbolt Docks: You’re almost always safe. The Thunderbolt 3/4 specification mandates MST support. If you have a Thunderbolt docking station, this lock is already open.
- USB4/USB-C Docks: This is the danger zone. You must scrutinize the product’s official specifications. Dig for the phrases “MST support,” “daisy-chaining capable,” or “multi-monitor via DisplayPort 1.2 MST.” If it’s not explicitly stated, assume it cannot do it. This chip is the reason a basic $30 USB-C hub can’t daisy chain monitors, but a proper docking station can.
1.3 The Quality Pipes: Certified DisplayPort Cables
The thin, generic cables packed in the box are not built for this job. To reliably daisy chain monitors, you need full-bandwidth DisplayPort 1.2 (or ideally 1.4) cables.
- The Upgrade: Purchase two new, certified cables. Look for the DisplayPort logo or “VESA certified” on the packaging. A high-quality cable is the difference between a stable image and a flickering, unreliable mess. This is one of the cheapest and most effective guarantees for your setup.
If your setup fails any one of these three checks, your path to a clean desk is to run two separate, high-quality cables from your docking station. That’s a perfectly professional solution.
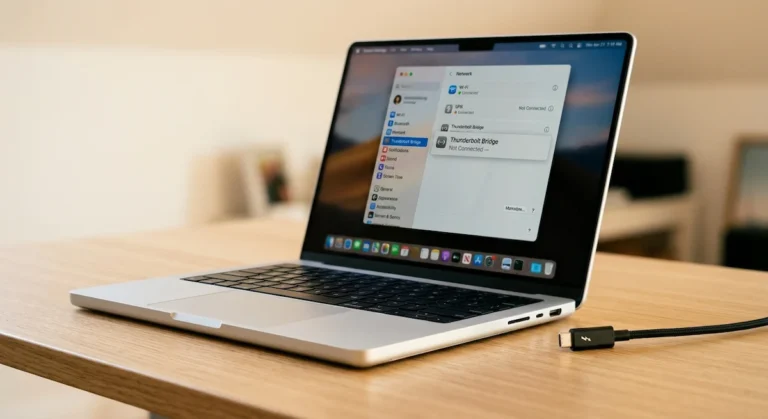
Apple’s Sequoia 15.3 introduced a regression that breaks MST daisy chaining on M1, M2, and M3 Macs using certain Thunderbolt docks. If your chain stopped working after a macOS update, this is the likely cause. Workaround: downgrade to Sequoia 15.2 or connect monitors via separate cables until Apple patches the issue.
2. Demystifying the Magic: How One Cable Carries Two Screens
Let’s replace jargon with a simple mental model. Think of your laptop’s video signal as a freight train carrying containers of pixels.
- The Old Way (Dual Cables): Your laptop prepares two separate trains. Your docking station is a switching yard with two outgoing tracks. It sends Train A down one track (Cable 1) to Monitor 1 and Train B down another track (Cable 2) to Monitor 2.
- The New Way (Daisy Chain): Your laptop prepares one long train with two container groups coupled together. Your docking station’s MST hub is the yard master who couples them. It sends this long train down a single track (Cable 1) to Monitor 1. Monitor 1 uncouples the first container group (its image), keeps it, and then sends the remaining part of the train (the second container group) out its DP OUT port onto a second track (Cable 2) to Monitor 2.
This process is called Multi-Stream Transport (MST). Your docking station builds the train. Your first monitor is an intelligent station that can split it. This is the core technical reason you need a proper docking station and specific monitors to daisy chain monitors successfully.
Before You Blame the Dock
Most dock failures aren’t hardware failures.
They’re bandwidth limits, MST instability, or USB4 lane splits collapsing under load.
If you’re pushing dual 4K through a single link, you’re not troubleshooting a device — you’re hitting the limits of the signal path.
Understand the architecture before you replace anything → /daisy-chain-monitors-explained/
Switching brands won’t fix a bandwidth bottleneck.
Before you replace your dock, understand the failure pattern first. Daisy Chain Monitors Explained →
If your setup is bandwidth-limited or MST-dependent, switching brands won’t fix it.
3. The Ritual: The Exact Order of Operations for Success
You have the right gear. Now, the sequence in which you connect and power everything is not a suggestion—it’s a protocol. This ensures a clean “handshake” between devices, which is the most common reason a second monitor isn’t detected.
Phase 1: The Cold Connection (Everything OFF)
- Shut down your laptop. Do not put it to sleep.
- Unplug your docking station from the wall outlet.
- Turn off both monitors using their physical power switches (not just the OSD).
- Now, and only now, connect your cables:
- Connect your laptop to the docking station with its main Thunderbolt/USB4 cable.
- Connect a DisplayPort cable from your docking station’s DP output to Monitor 1’s DP IN port.
- Connect a second DisplayPort cable from Monitor 1’s DP OUT port to Monitor 2’s DP IN port.
Phase 2: The Staggered Wake-Up
- Plug in and turn on your docking station. Wait for its power/status LED to become solid.
- Turn on Monitor 1. Wait for it to show its logo or “No Signal” screen (3-5 seconds).
- Turn on Monitor 2.
- Finally, power on your laptop.
This ritual ensures each device in the chain boots in a downstream order, ready to accept a signal from the device before it. It’s the single best practice to get your daisy chain monitors setup working on the first try.
🟡 Pattern Check — Are You Fixing a Setup or Fighting the Wrong Architecture?
You’ve tried the updates. You’ve power-cycled. Still acting up. Here’s how to tell if it’s fixable or fundamentally broken.
| You’re fixing configuration if… | You’re babysitting instability if… |
|---|---|
| Chain worked, stopped after OS update | Second monitor was never detected from day one |
| Flickers only at high refresh or with HDR on | Monitor 1 has no DisplayPort OUT port |
| Disconnects only after sleep/wake | Dock has no MST support listed in specs |
| Works on one port but not another | Running dual 4K + HDR + 144Hz simultaneously |
Thunderbolt 5 removes the bandwidth failure class entirely. If you’re chaining dual 4K displays and hitting limits, TB5 is the only architecture that handles it without compromise.
See Stable Chain Docks → Find My Dock in 60 Seconds →4. Telling Your Computer What You’ve Built (OS Setup)
The physical chain is live. Now you must configure your operating system to use these new, extended canvases.
For Windows 10 & 11 Users:
- Right-click your desktop and select Display settings.
- You should see three numbered rectangles. Click the Identify button—large numbers will flash on your screens, telling you which is which.
- Scroll down. Click on rectangle #2. In the settings that appear, find the “Multiple displays” dropdown and select “Extend desktop to this display.”
- Repeat step 3 for rectangle #3.
- At the top of the window, click and drag the rectangles to match your physical left/right arrangement.
- Click “Keep changes.”
For macOS Users (Sonoma/Ventura & later):
- Go to Apple Menu > System Settings > Displays.
- You’ll see a graphical arrangement of your screens. Click on the box representing your external displays.
- For each, set the “Use as:” dropdown to “Extended Display.”
- To arrange them, simply drag the white menu bar from one display box to another to set their relative position.
A frequent hiccup is finding the monitors “mirrored.” This is always a software setting. Go back and ensure each external monitor is individually set to “Extend” or “Extended Display.”
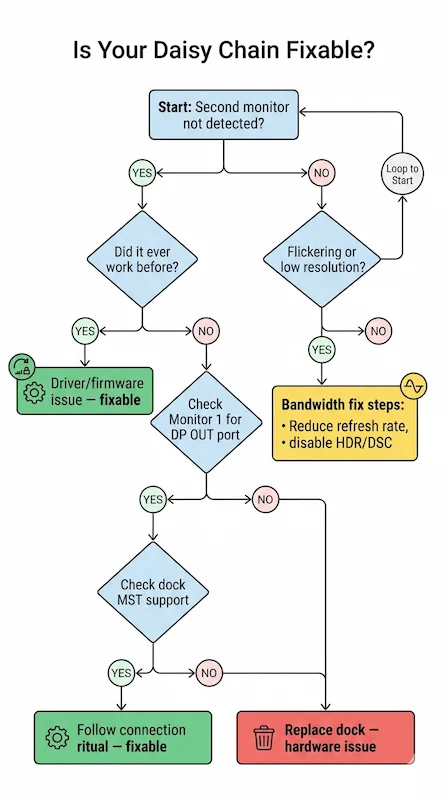
5. The Diagnostic Tree: When Your Daisy Chain Breaks
This is the core of the guide—the logic tree I follow when a client’s setup fails. Follow it step-by-step.
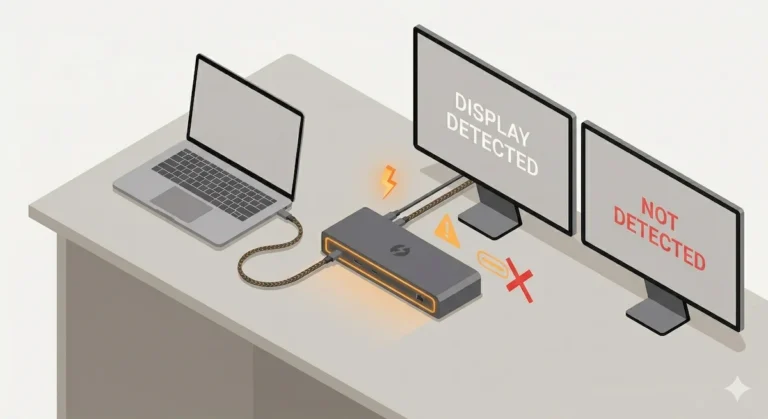
Symptom: “No Signal” on the Second Monitor
- Step A – The Soft Reset: In your OS display settings (Windows or Mac), find and click the “Detect” button.
- Step B – The Input Check: On the problematic monitor, press its physical menu button. Navigate to Input Source or Input Select and manually choose “DisplayPort.” Do not leave it on “Auto.”
- Step C – The Driver Sweep (The Most Important Fix): Outdated graphics drivers are the #1 cause of MST/chain failures. This is not optional. Perform a clean install of the latest GPU driver from NVIDIA, AMD, or Intel’s website. This exact process is detailed in our guide for when your Thunderbolt dock isn’t detected at all.
- Step D – Hardware Isolation: Disassemble the chain. Connect each monitor directly to the docking station with its own cable. If one works and the other doesn’t, you’ve found a faulty monitor or cable.
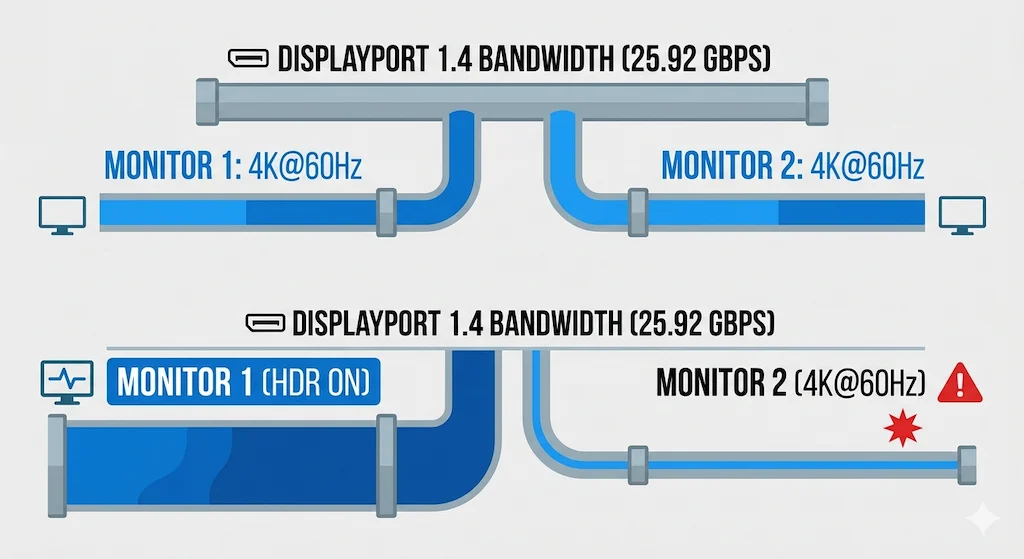
Symptom: Flickering, Artifacts, or Low Resolution on Monitor 2
- The Diagnosis: Bandwidth Starvation. The single connection from the docking station is a shared pipeline. If Monitor 1 is using too much, Monitor 2 suffers.
- The Prescription: Reduce Monitor 1’s bandwidth consumption.
- Turn OFF HDR (High Dynamic Range) in the monitor’s OSD or Windows/Mac display settings. HDR is a massive bandwidth hog.
- Lower the refresh rate from 144Hz or 120Hz down to 60Hz.
- Consider lowering the resolution on Monitor 1 as a test (e.g., from 4K to 1440p).
Symptom: Intermittent Disconnects After Working Fine
- Suspect #1: Thermal Throttling. Place your hand on your docking station. Is it very hot to the touch? Heat causes the MST chip to throttle, breaking the chain. Improve ventilation immediately. This is a critical weakness of many powerful, compact docks, as we documented in our UGREEN Revodok Max 213 deep-dive.
- Suspect #2: Power Starvation. Is your laptop also charging through the docking station? The combined load of charging and driving two displays can overwhelm some docks. Try using your laptop’s native charger temporarily to test.
- Suspect #3: The Weak Link. The cable between Monitor 1 and Monitor 2 is under unique stress and is the most common point of failure. Replace it with a known-good, high-quality certified cable.
Windows 11 24H2 broke MST detection on several USB4 docks, causing the second monitor to drop on wake. Fix: go to Device Manager → Display Adapters → update your GPU driver manually from the manufacturer’s site. Microsoft’s automatic update does not always deliver the correct version.
🔴 Last Resort — Stop Troubleshooting. Your Chain Is Broken by Design.
If you’ve worked through every fix and it still fails, stop. You’re not troubleshooting a glitch — you’re fighting hardware that was never capable of daisy chaining. Replace your setup if:
- ✅ Monitor 1 has no DisplayPort OUT port — physically impossible to chain
- ✅ Your dock has no MST support — no driver or firmware fix exists
- ✅ You need dual 4K at 144Hz with HDR — bandwidth will always collapse on DP 1.2
- ✅ You’re on Apple Silicon with a non-Thunderbolt dock — architecture doesn’t support it
Rule of thumb: if the hardware doesn’t support it, no amount of troubleshooting will make it work.
The clean solution: run two separate DisplayPort cables from your dock. Same desk, zero fights.
See Comparison Table → Find My Dock in 60 Seconds →6. The Honest Comparison: Chain vs. Separate Cables
Choosing to daisy chain monitors is a tactical decision with clear trade-offs. It is not inherently “better.”
| Aspect | Daisy Chain Monitors | Separate Cables from Dock |
|---|---|---|
| Cable Management | Excellent. One cable from dock to desk enables a truly clean, minimalist look. | Poor. Multiple cables create visual clutter and management headaches. |
| Hardware Requirements | Stringent. Requires specific monitors (DP OUT) and a dock with MST. | Minimal. Works with any modern monitor and virtually any docking station with multiple video outputs. |
| Performance & Bandwidth | Shared & Limited. Total resolution/refresh rate is capped by the single connection from the dock. | Dedicated & Maximal. Each monitor gets a full, uncontested connection from the docking station. |
| Reliability & Troubleshooting | More Complex. A fault in one link (cable, monitor port) can break the entire chain. Debugging can be tricky. | Simple & Robust. Each connection is independent. A fault with one monitor doesn’t affect the other. |
| Best Use Case | The productivity-focused professional who values a clean aesthetic and uses standard office applications. | The gamer, creative professional, or power user who needs maximum, guaranteed performance from each screen. |
The Bottom Line: You daisy chain monitors for the clean desk. You use separate cables for maximum performance and compatibility. One is not superior to the other; they are different tools for different priorities.
If your chain passed the hardware checks but still fails under load, the dock is the bottleneck.
At this point, you’re not troubleshooting anymore — you’re choosing the right architecture.
7. Docking Stations Engineered for a Stable Chain
Daisy chaining is fragile. These docks absorb that fragility in different ways.
CalDigit TS4
Thunderbolt 4 · Passive Cooling · 2.5GbE
- MST Support: ✅ Certified — no configuration required
- DP Output: DisplayPort 1.4 — full bandwidth
- Max Chain: Dual 4K@60Hz or Dual 1440p@144Hz
- Thermal design prevents MST throttling under sustained load
The most reliable daisy chain dock tested — if budget isn’t the constraint, this is the one to buy.
Check Price →Kensington SD5780T
Thunderbolt 4 · Active Cooling · 2.5GbE
- MST Support: ✅ Certified — stable under sustained load
- DP Output: DisplayPort 1.4 — full bandwidth
- Max Chain: Dual 4K@60Hz
- Active fan cooling eliminates thermal throttling risk
Best for 24/7 daisy chain loads — fan noise is the trade-off, Mac instability reported.
Check Price →Plugable TBT4-UDZ
Thunderbolt 4 · Passive Cooling · 2.5GbE
- MST Support: ✅ Certified — 4-display MST on Windows
- DP Output: DisplayPort 1.4 — full bandwidth
- Max Chain: Dual 4K@60Hz
- Mac multi-display: requires M1 Pro/Max or higher
Strongest MST implementation for Windows — Mac users need Pro or Max chip to run dual displays.
Check Price →UGREEN Revodok Max 213
USB4 · Passive Cooling · 1GbE
- MST Support: ✅ Yes — via USB4 protocol
- DP Output: DisplayPort 1.4 — full bandwidth
- Max Chain: Dual 4K@60Hz (thermal ceiling applies)
- Budget TB4 alternative — ventilation mandatory
Best value for daisy chaining — but you are the cooling system. Don’t enclose it.
Check Price →Dell WD22TB4
Thunderbolt 4 · Passive Cooling · 1GbE
- MST Support: ✅ Certified — deep Dell BIOS integration
- DP Output: DisplayPort 1.4 — full bandwidth
- Max Chain: Dual 4K@60Hz
- Stable on Dell hosts — handshake issues on non-Dell laptops
Reliable daisy chain dock for Dell users — non-Dell laptops should look elsewhere.
Check Price →Dell SD25TB4
Thunderbolt 4 · Passive Cooling · 1GbE
- MST Support: ✅ Certified — enterprise-grade stability
- DP Output: DisplayPort 1.4 — up to 4x 4K displays
- Max Chain: Dual 4K@60Hz
- Remote OOB management — IT-managed Dell fleets only
Enterprise daisy chain dock for Dell IT teams — overkill and unreliable outside the Dell ecosystem.
Check Price →Monitors shipping in 2026 with DisplayPort 2.1 UHBR10 support can carry dual 4K@144Hz through a single cable — bandwidth that was impossible on DP 1.2 chains. If you’re building a new setup from scratch, verify both your dock and primary monitor support DP 2.1 before assuming you can chain at high refresh rates.
8. The Final Decision: Is This Path Right for You?
Let’s be brutally honest. The desire to daisy chain monitors is often an aesthetic one. That’s valid. But it must be weighed against practical reality.
Commit to the chain if you answer YES to these questions:
- Do both of my monitors have a confirmed DisplayPort OUT port?
- Is achieving a minimalist, cable-free desk aesthetic a top-3 priority for me?
- Is my primary work (coding, writing, data analysis, browsing) not dependent on pushing 144Hz or HDR on both screens simultaneously?
Choose the separate cable path if you answer YES to these:
- Are my monitors used for competitive gaming, color-critical video editing, or financial trading where every millisecond and pixel counts?
- Do I use a mix of HDMI and DisplayPort monitors?
- Does the phrase “update my Thunderbolt controller driver” fill you with a sense of dread?
- Do I value plug-and-play simplicity over an ultra-clean look?
Learning how to daisy chain monitors is a skill that unlocks a cleaner workspace. It is a specific solution for a specific set of circumstances. Start with the three-lock checklist. Follow the connection ritual. Use the diagnostic tree when things go wrong. Whether you end up with a flawless chain or a robust dual-cable setup, you’ll have made an informed choice to build a better, more intentional desk.
Remember: The goal is a more effective workspace. A flawless daisy chain monitors setup achieves that through elegance. A reliable dual-cable setup achieves it through brute-force simplicity. Both are victories.
9. FAQ
Still not sure if daisy chaining is right for your setup?
Use our Dock Finder to match your laptop, monitors, and workload to a stable setup — in under 60 seconds.
Find My Dock →Author & Trust Section
Hans Pedersen
Display Systems Specialist, ByrdPilot.com
I specialize in why multi-monitor systems fail under real-world load — not in lab demos, but in trading floors, post-production studios, and legal environments where a dead display directly costs money.
My focus is display protocol behavior:
MST negotiation, EDID handshakes, Thunderbolt tunnel instability, and how bandwidth collapses under sustained dual 4K load.
This guide is built from field deployments and post-failure diagnostics — not marketing claims.
When we reference thermal throttling in compact USB4 docks or fragile DP OUT implementations, those conclusions are cross-validated with Alex’s hardware-layer failure analysis and Yamato’s infrastructure modeling. ByrdPilot analyzes systems as ecosystems, not as isolated devices.
Daisy chaining is not a feature. It is a signal-routing architecture with tight tolerances.
This guide exists to show you where those tolerances are — and when separate cables are the more reliable engineering decision.